I haven’t formally declared by passion for Pinterest on the blog yet. Oh yes, I said Passion. If read this post you know my love for inspiration boards, and this post talked about my storage system. Pinterest is GENIUS! For me it’s essentially online inspiration boards.
I’m addicted. You can check out all my boards here.
_____________________________
So why the declaration of love for Pinterest? Well I have another DIY project inspired by this pin. Original project by Martha Stewart.
I loved this idea the moment I saw it and it’s SO easy.
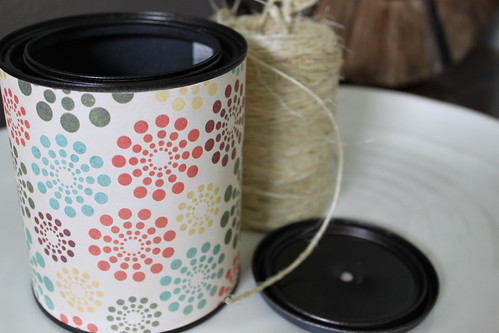
During my trip to Lowe’s this week, I picked up a ball of twine for an outdoor project (to be shared later), and an empty paint can. Later I picked up a piece of scrapbooking paper from Michael’s.
With a 1/4” Bit, I drilled a hole in the lid.
I decided to paint the parts of the can that won’t be covered with paper with my beloved Oil Rubbed Bronze spray paint. However, you can easily end the project after you drilled the hole into the lid. Just drop in the twine, thread through the hole, and pop on the top.
I painted the entire lid…
And the top/bottom rims of the paint can. The middle portion was later covered with paper.
Now for the fun part!
Step 1: Wrap the paper around the can, marking your cuts with pencil. One large square piece of paper will cover the can if you wrap it at an angle. So if you picked up paper with vertical stripes, you’ll likely need two sheets to keep everything even.
Step 2: Cut the paper, and glue to the can. I used tacky art adhesive. Make sure everything is dry and secure. Drop the twine in the can, thread through the lid, and pop on the top.
I honestly don’t use twine all that often, but I kind of want to display this in my house.
Project Costs:
Empty Paint Can (Lowe’s): $3
Ball of Twine (Lowe’s): $4
Scrapbooking Paper (Michael’s): $2
Oil Rubbed Bronze Spray Paint (Lowe’s): $0 (Already Owned)
Total Project Cost: $9
SHOWING THE LOVE!
Linking to: Remodelaholic, Works For Me Wednesday, Blue Cricket Design, Beyond The Picket Fence, Ohh Baby Designs, 5 Minutes Just For Me


Hey There. I found your blog using msn. This is a really well written article. I’ll make sure to bookmark it and come back to read more of your useful info. Thanks for the post. I will definitely return.
Pingback: Planting Grass on Concrete – Part 1 | Changing My Destiny
Pingback: Monthly Project Recap – September 2011 | Changing My Destiny
Fun DIY and Pin On!!!!!
Pingback: Crafty DIY: Halloween Sign | Changing My Destiny
Pingback: DIY Christmas Ornament 5: Cardboard Flower | Changing My Destiny
Pingback: 2011 Recap | Changing My Destiny
Pingback: Frugal Friday: DIY Organization Ideas | One Good Thing by Jillee