Easy DIY – Eraser Stamped Journals

DIY_Eraser Dot Journals_8

I’m in a crafty mood lately, so yesterday I decided to try my hand at the ‘Pinterest-popular’ eraser dot/stamping technique. The basic concept is to use a pencil eraser as your paint brush. The project was fast, easy and since you can wipe the erasers clean…there was very little mess. 

DIY_Eraser Dot Journals_1

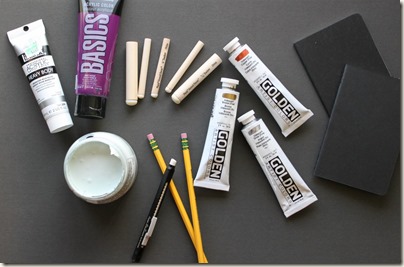
Supplies:

– Blank cover notebooks. I used Moleskine Pocket Cahier booklets which come in a set of three.

– Paint in your favorite colors. You can use any type of opaque paint for this project. I used Acrylic paints because that is what I had on hand, but you can use craft paint or even stamp pads for another cool look.

– Classic #2 Pencils with pink erasers. I also tested the dot technique with a Pentel Clik Eraser and some craft Stencil Daubers. All worked, but the yellow pencil/pink eraser provided the best result.

– Paper Towels and a little water for clean up, and small paint brush is helpful for any paint touch-ups you may find necessary.


 DIY_Eraser Dot Journals_4

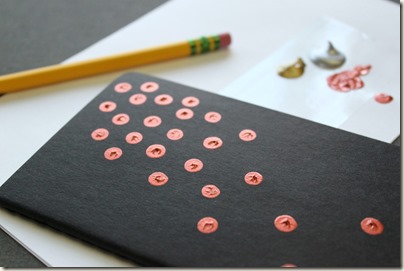
I decided to do the first notebook with metallic dots. I used the pencil eraser to dot copper dots on first. I found it helpful to keep a small paintbrush on hand to gently tap down any paint that peaked as you can see on some of the dots above. It’s not necessary to do this step, it was just my personal preference.

 DIY_Eraser Dot Journals_5

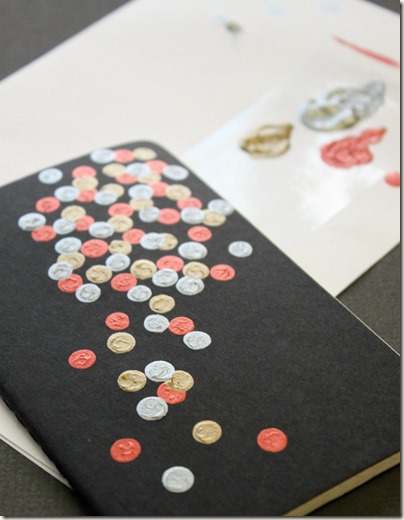
I gave the copper dots a minute or so to dry, then I used the same pencil eraser to dot on some gold paint.

 DIY_Eraser Dot Journals_6

Then I added some silver dots. Since you are using such a small amount of paint, the booklet dries very quickly.

SUCCESS! I love the finished journal!

 DIY_Eraser Dot Journals_2

While the metallic booklet was drying, I tried using the Pentel Clik eraser to dot the other booklet.

 DIY_Eraser Dot Journals_3

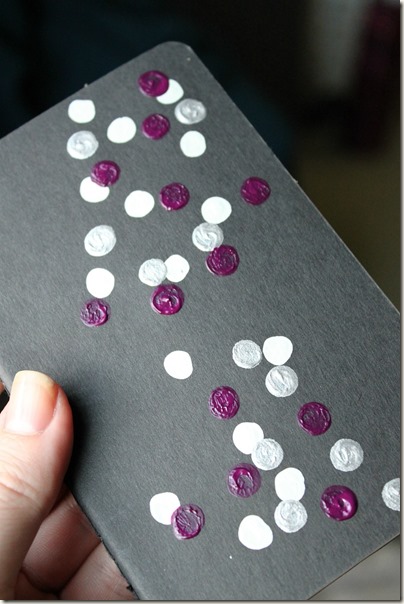
I used Aqua, Dark Purple, and Silver for this one.

 DIY_Eraser Dot Journals_7

I didn’t like this finished booklet as much since the Clik Eraser didn’t stamp the paint as cleanly as the Pencil Eraser. You can see the difference in how poorly the purple stamped. That was partly due to the eraser and partly due to the type of paint. The aqua and silver worked just fine so I would recommend testing the paints you choose on a piece of paper before you stamp your final product. I had such good luck with the fist booklet that I didn’t test out the purple paint…but you live and learn.

It’s still pretty in it’s own way and now I have two lovely personalized booklets to write in. Bonus, clean up was a breeze and the whole project was done in less than 20 minutes. These would also make great gifts to the book/journal lover in your life!


What DIY Projects have you been working on lately?

Office Remodel – Update

I’m going to just jump right back into blogging and hope you don’t realize that I’ve been MIA for about 6 months…sorry. Reality is that I needed a break. I tried to come back earlier this year, and as much as I wanted to blog, I couldn’t get the words out. I started so many posts over the past few months and they sit unfinished. So I figured a break was in order, always knowing that I would be back. So here I am…and I have some exciting projects to share with you. Please bare with me as I get back into my writing groove.

But first…Thank you for all the kind notes that were sent to me over the past few months. So many of you were encouraging me to come back and that meant so much to me. I greatly appreciate every single message/email. THANK YOU!

Two projects that have been a long time coming are a Office Remodel and a Backyard Update. I have a bit of cleanup to do in the yard, so that update will come later this month. Today I’m excited to show you some progress in the office.

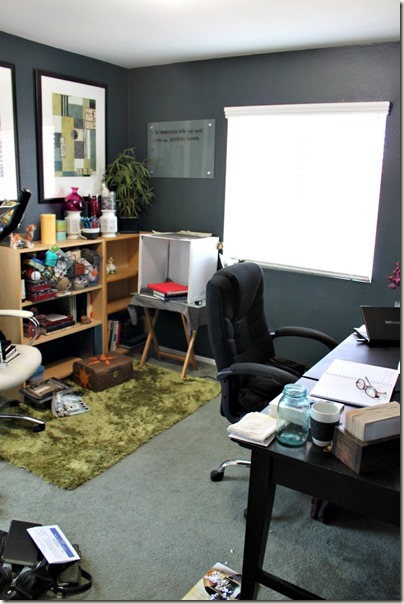
Anyone remember this (very messy) room? I can’t recall the last update I provided, so we’ll start here.

Office Remodel_Before1

Office Remodel_Before2

First I had to clean…a lot.

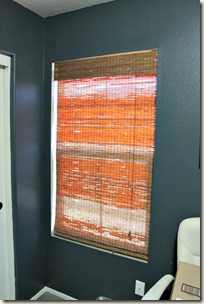
Next I swapped out the broken white wood blinds for bamboo blinds.

Office Remodel_Blinds1

Then I added molding to each window to create the architectural frame. For such a small investment, the effect is amazing in the (nearly) finished room.

 Office Remodel_Blinds2 Office Remodel_Blinds3

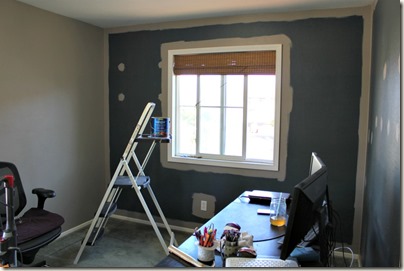
Next Up…Paint!

Office Remodel_Paint1

I wanted to pick something neutral for the walls so I could use accessories in different colors. I like to vary my decorations based on seasons and holidays, so a neutral color wall works perfectly. The color is Valspar Hot Stone.

 Office Remodel_Paint2

Depending on the lighting, the color can appear light brown or taupe. I do wish it were a bit lighter, but for now it works really well.

 Office Remodel_Paint3

After moving the desk and filing cabinets back in, I decided to tackle the lighting situation. I also wanted to install a ceiling fan since the summers are scorching hot.

The dreaded boob light…sigh…

Office Remodel_Fan1

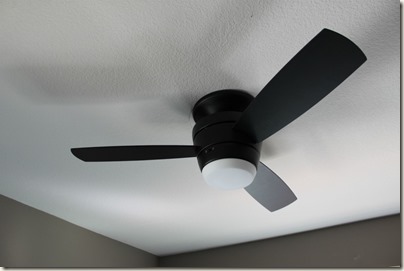
…now looks like this! I loved the fan so much, I’ve added 3 more throughout the house.

 Office Remodel_Fan2

I found these beautiful black Allen & Roth fans at Lowes on sale for about $100 each. This model is no longer listed online; however, Harbor Breeze sells a very similar model (HERE).

 Office Remodel_Fan3

Since the picture above was taken, I’ve added a chaise lounge and built an ‘L-shaped’ desk. But those are for another day…

I’ll be back Friday (I promise!), hope you are all having a wonderful week. Happy October!!

New Fruity Terrariums

That project I tried to do a few weeks ago is finally DONE, and I LOVE IT!

Actually, I’ve been wanting to do this project for about a year since I’ve had these pretty containers sitting empty for about that long. If you recall I had a little bird mishap a few weeks back, but I finally got around to cleaning the containers and buying new succulents.

I picked these up at Homegoods but I wasn’t sure at the time what I wanted to do with them. After the success of my DIY Succulent Terrariums, I figured these would work the same way. The novelty of a giant pear and apple in my house was just too perfect, I couldn’t help but buy these.

Apple & Pear Succulent Terrariums

These suckers were tough to clean though, they are somewhat heavy glass and have only the one open spot (just big enough for one hand), so it was a struggle. They look much cleaner in person, but the camera picked up lots of lint.

If you want step by step instructions, check out the DIY Terrarium link above…I followed the same steps. I started out with some small rocks. I think these actually came from Hobby Lobby for less than $3, and it was enough for both planters.

Apple & Pear Succulent Terrariums

Next, I topped with Cactus Soil. It allows for better drainage than potting soil.

Apple & Pear Succulent Terrariums

Then add in small succulents. I picked mine up from Lowes, but their selection was lacking so I didn’t have much variety in these. I plan on swapping out the plants for more colorful options when they get more in stock.

Apple & Pear Succulent Terrariums

Apple & Pear Succulent Terrariums

Apple & Pear Succulent Terrariums

I never used to be a cactus/succulent fan, but they’ve seriously grown on me. I love having these little setups all over the house. They are simple, but so beautiful and require little work for them to live.

Office Update – Window Mouldings

I always hate when a weekend ends, but this once has been pretty good. I hope everyone else was able to enjoy a few days off, with family, or doing something you enjoy. It was warm here, as expected, so we stayed in most of the time. I did run some errands on Saturday, and caught up on schoolwork. On Sunday I was inspired to get stuff done, so I broke out the tools and worked on the office. While I did buy the supplies for the yard, it was too warm to work outside so I hope to make some progress in the evenings this week.

Looking back, this is what the office looked like when I first moved in. Green carpet and green walls. In fact the whole house was green carpet and green walls, so I wanted to change things up right away…it was just a little too much sage green.

K10036663_9_0 

I’ve shared this part of the transformation before, but in case you missed it, I’ll recap. I had originally planned for this to be a vintage travel themed room. Dark walls, vintage travel posters and strictly for the day job. I have another spare bedroom which was going to be my personal office, but that has since been turned into an actual spare bedroom. While I do like the color, it’s very cozy…it’s too dark. I realized that fairly soon, and never did the second coat of paint that it required. You’ll be able to see the spotting paint job in the below pictures.

I didn’t clean up before taking these ‘Before’ pictures a while back…ya know, keeping it real. I’ve since changed a few things, but for the most part it looks pretty much the same.

Right side of the room…

Office Before

Due to the angle, I can’t get a picture of the whole room without taking the door off it’s hinges (not gonna happen right now). So you’ll have to deal with these split up shots as the re-design continues. I do plan on painting the door at some point, so I’ll try to get a full photo then.

Left side of the room…

Office Before

You can see the white blinds in the shots above. I removed them a few months ago and replaced them with bamboo blinds. While the white blinds are nice, they were broken on the window behind the bike and expensive to replace since their considered custom sizes. It’s a builder grade home with custom windows…go figure.

This next phase was to add moulding to the windows before I get started painting. The first time I ever cut window moulding, I did it by hand with a MITRE box and hand saw…holy torture. I can move a queen size mattress & box spring up 3 flights of stairs by myself, but I can’t cut a piece of moulding by hand. Seriously! So when my dad helped me with another moulding project (yet to be shared on the blog), he left his MITRE saw for me to use. AMAZING! The last moulding project took me nearly all day to finish…this project took less than an hour and I did 3 windows (2 in the office and 1 in my bathroom).

I still need to fill and caulk the moulding, but I’m excited to finally see some progress in the room.

Before – Window 1

Office RE-Design: Window Moulding_In Progress

After – Window 1

Office RE-Design: Window Moulding_In Progress

Before – Window 2

Office RE-Design: Window Moulding_In Progress

After – Window 2

Office RE-Design: Window Moulding_In Progress


Next steps:

  • Fill & Caulk the Moulding
  • Repaint the Whole Room (Including window moldings)


Fingers Crossed – I’ll have another update for you next week.

Tiny Tweaks!

I’ve been in a bit of a home decor funk lately. Progress has stalled and I’ve been itching to makes some changes. Since subtle changes throughout the house can make a huge impact, I thought I’d tackle a few.

First project was to install new blinds in the Spare bedroom. I took down the old wood blinds months ago when I added the window moulding, but I wasn’t sure what to use as a replacement. Then I read this post from Young House Love, and they shared a link to some bamboo blinds that were incredibly affordable. My window is not a standard size so it’s been difficult to find inexpensive window coverings.

Spare Bedroom Update -  Bamboo Blinds

The bed was completely made before my pup decided to ‘make it more comfortable’. He has a tendency to photo bomb my project pictures. Don’t see him? Look closely at the dark blanket…see that dark brown blob? Yep! He kicked all the pillows off the bed just to curl up at the bottom.

The blinds were pretty simple to install. The hardest part was fitting the screwdriver between the window and the hardware in that back corner. Once the brackets were installed I slipped the blinds on and tightened the included wing nuts. Easy!

Spare Bedroom Update -  Bamboo Blinds

Not bad for a $30 quick fix!

Spare Bedroom Update -  Bamboo Blinds

The next step is to swap out the lampshade for a simple white ceiling fan. I know they aren’t the most attractive things, but it’s all about function when the summers hit 110 degrees (and your AC is broken).

Another doggie photo bomb! He’s such a creeper, staring at our neighbor’s house.

Spare Bedroom Update -  Bamboo Blinds


With the successful Spare Bedroom tweak under my belt, I headed over to Target to pick up some night lights. My home is very compacted…by that I mean it’s tall (a 3 story condo), but it’s skinny. Lighting in the house doesn’t cover an expansive area and I’m constantly turning on a new light every few steps. It’s annoying. The night lights allow me to walk throughout the house without having to turn on and off every single light.

I found these awesome LED lights for about $8 each.

Fancy Night Lights_1

Is it weird that a night light is my new favorite home decor item?

Fancy Night Lights_2

It’s beautiful and it covers those ugly outlets! I also love that they don’t have switches. They automatically turn on at dusk and off at dawn, or as needed when the lights are turned off.

Fancy Night Lights_3

It’s like a little piece of art on the wall.

Fancy Night Lights_4

I also have one of this design in the Spare Bedroom. It’s not as bright as the other style, so it’s a little less disturbing in a bedroom.

Fancy Night Lights_5

The last easy tweak was to do a little remodel in my bedroom. The Master bedroom has been a design challenge for me. I can’t quite figure out what to do with it. What you see in the pictures below is only half the room, it’s big, but like the rest of the house, it’s skinny, so it doesn’t feel particularly spacious.

I actually like having the bed is this placement, but I really hate the window behind the bed frame. I’m toying with a bunch of different ideas, but for now I just wanted to try a different placement for the bed.

M Bed_1

Since this is temporary, I left the art up on the wall even though the bed is now blocking it. I do like being able to see the window better, but it doesn’t leave any space for a nightstand. I’m using a small bookcase right now and while it’s functional, it’s just not working. 

[There he is again! We should play some sort of ‘Spot the Dog’ game.]

M Bed_2


What kind of tweaks have you been doing around the house?

Enhancing Simple Canvas Art

A few snapshots from DC last night. All the holiday lights are so beautiful! I love this time of year. Today is going to be a lazy…mainly because I feel lazy after travelling all day yesterday. Also because it’s in the 30’s outside! This California girl is shivering just thinking about it.


As promised…here’s a fairly easy project I did a few weeks ago to dress up a wall in my hallway. I don’t have a great picture, but it’s a pretty narrow hallway so I couldn’t put any type of furniture here. I was also worried about doing anything with glass since, while playing, the dog knocks into this wall fairly often. I don’t want to risk broken glass on the carpet.  Shattered glass and puppy feet do not mix, and he doesn’t seem to understand me when I’m yelling at him to stay away from the glass. Go figure.

Enhanced Art Wall_3

Enhanced Art Wall_2

It needed something.

Enhanced Art Wall_1

For the first year I was living in this house, I put up this wood piece. I picked up a pair of these at HomeGoods and it seemed to fit well. The other half is nearby on another wall. But after a while it seemed boring and I wanted some color. 

Enhanced Art Wall_4

So enter another piece of HomeGoods art. I love these pieces and actually have a second one hiding in the spare bedroom to use in the office remodel.

Enhanced Art Wall_5

However, the art if almost the same color as the wall. The art has a little more beige and the wall is a little more pink. Even with the type color, it was blending into the wall. 

Enhanced Art Wall_6

So I built a backer.

I wish I could articulate how easy building something like this truly is. If you have some sort of saw (circular seems to work best for me) and a drill/screwdriver, you’re all set. After a bit of measuring, I cut down 2 – 1 x 6 boards to make this. To make it a lighter (and a little cheaper), I didn’t use long planks in the middle.  After cutting the planks, I used a thin unfinished moulding strip and some screws to hold it all together.

Using just the screws means it is a little wobbly when you’re holding it. However, it’s solid once up on the wall. You could add more screws and some wood glue to make it more sturdy.

Enhanced Art Wall_7

I finished the backer with a dark Kona stain and hanging hooks.

Enhanced Art Wall_8

In order to hang the art, I added a nail to the front.

Enhanced Art Wall_9

SO MUCH BETTER!

Not only do the colors pop, but I love the rustic feel to the wood backer. The larger backer also helps balance the wall space better.Enhanced Art Wall_10

Enhanced Art Wall_11

Enhanced Art Wall_12

I had the thin moulding on hand, but they’re fairly inexpensive. I believe an 8 foot strip costs about $4 at Lowes. The 1×6 board ran about $3 each. So over all the project cost me $6 since I only needed the 1×6 boards. Even with the moulding and screws, it would have been less than $15. Not bad to create a larger impact piece out of some simple canvas art. 

DIY – Paint Dipped Holiday Pinecones

No grocery post this week. Partially because I’ll be at my parents house for the holiday, and partially because I’ve been fighting off a terrible cold. Just when I think I’m getting better, it takes a turn for the worse. I ended up taking Friday off of work, and I slept away most of the weekend. Ugh…I just want to feel better already. So instead of my grocery challenge update this week, I have an easy little DIY that I did a few weeks ago.

These would be great on a holiday table, mantle, or use them for place cards by tucking a little piece of paper with your guest’s name into the top.

Paint Dipped Pinecone_1

Last year I purchased a bag of Cinnamon Pinecones during the holidays. I love the scent so much that I left them out all year. I’ve used them in a variety of crafts and they work with a rustic decor year round. You can just spritz them with a little cinnamon oil when they need to be refreshed.

Paint Dipped Pinecone_2

You don’t need the cinnamon scented ones for this project. Use whatever pinecones you can find outside. If necessary, let them dry out for a few days. If you think there are any little bugs in there, toss them in a plastic bag, and store them in the freezer overnight.

 Paint Dipped Pinecone_3

Next, grab some paint. I used some bronze, gold, and silver paint that I already had, so the project ended up being free. Golden is my favorite brand of paint for shimmery metallic finishes. They are an ‘art’ paint, not craft paint, so they are more expensive.

 Paint Dipped Pinecone_4

Paint the outer third of each scale. I also painted the outer ‘pointy’ edge so that the scales appeared ‘dipped’ in paint. I found it easiest to work from the bottom up.

 Paint Dipped Pinecone_5

 Paint Dipped Pinecone_6

I finished all three pinecones in about 20 minutes. It was easy and so versatile. How fun would these be painted with fluorescent paint and used for a spring mantle! You could also attach a string or ornament hanger and use them to decorate your tree.

 Paint Dipped Pinecone_7

 Paint Dipped Pinecone_8

If you want a little sheen, you could spray the finished pinecone with an acrylic sealer.

The $6 Tile Project

One thing I’ve noticed about being a homeowner is that you must have a little savings set aside, because when you least expect it, something will break. I miss having a landlord sometimes. Case in point, my garbage disposal died last week. Granted, I don’t expect my appliances to give me two weeks notice (wouldn’t that be nice), but this is getting a little out of hand. In the two years I’ve lived in this home, my washing machine has burned out, my AC has stopped working, the oven heats up hotter than the sun, and now my garbage disposal died. I should also mention it all happened right after my home warranty expired. 

This is where a contingency fund, and a DIY attitude comes in handy. Of all the appliances that could break, the disposal is fairly inexpensive, so I’ll count myself lucky for now. Since I was clearing out the kitchen cabinet to replace the disposal, I also decided now would be the perfect time to cross another little ‘to do’ off the list.

This is the cabinet below the sink. This picture is about 2 yeas old, but it generally looks this bad. The pipes create a bit of an organizational challenge. I’ve also found that the inexpensive cabinetry bubbles badly if it gets wet. I needed a fix for that STAT. 


First step was to fix the garbage disposal, so everything had to come out. I ordered the replacement disposal through Amazon since it was cheaper than the model at Lowes, and it had great reviews. At Lowe’s it would have cost me about $240, but through Amazon I scored the disposal and necessary electrical plug for about $150. I did have to go to Lowes for a small container of Plumbers Putty, but overall Amazon offered the best deal.

Installation was fairly easy and took a little over an hour. I did have some help, but it could be done by one person if necessary. The hardest part was lifting the heavy unit up to attach it to the sink. We ended up propping it up with an upside down bucket which helped keep it level while we attached it.

Under Sink Tiling_1

It’s amazingly quiet, I never realized how loud my old model was before this was installed.

Now for the fun (& surprisingly easy) part!

To keep the bottom of the cabinet from getting destroyed by any leaks or spills, I decided to add tile. I picked up 6 vinyl tiles from Lowes for less than $1 each. Vinyl tile gets a bad rap for being dated (hey I know, I grew up with it too), but it’s come a long way. I was really impressed with the styles they now have available, they are a great knock off for stone if you’re looking to do an inexpensive update.

Under Sink Tiling_2

The tiles are self adhesive so all I had to do was cut them down to size using a box cutter. The project took less than 30 minutes from start to finish. The hardest part of installing the tiles was that the cabinet isn’t square, so some edges were difficult to meet, but it worked out.

Under Sink Tiling_3

Not bad for a $6 makeover. Pretty and functional.

DIY Tiered Shade Bedroom Lighting

It’s finally Friday! Yay! I hope everyone has been having a great week. I’m honestly glad this one is over, between me being sick and one of the puppies  being sick…it’s been a rough week. Luckily both of us appear to be doing better so I hope to finally get that grass redone in the yard this weekend if the weather cooperates. I’ve also been working on some new art pieces lately that turned out better than expected so I’ll share more soon. Since I couldn’t get the grass done last weekend (it was raining), I worked on a light project for the Spare Bedroom.

I have been coveting this tiered pendant light for quite some time. Unfortunately it runs almost $400 and that’s not in the budget for a spare bedroom that will be rarely used. Honestly, it’s also too big for such a little room, but I love the tiered look.

Lights Up! Kimono Deco 21" Wide Pendant Light

Source

So I decided to create my own smaller, far cheaper version (mine cost less than $30) out of the existing light fixture that came with the house. Yes, that is the dreaded boob light fixture; although, I already removed the ‘boob’ before taking the pictures so just use your imagination…unless you find that weird. In that case, whatever you do, don’t think of boobs…

…and now this post has just taken an awkward turn.  I wish I could say it will get better, but these lamp manufacturers have a serious sense of humor when naming these things.

Bedroom Light DIY_1

Step 1: (Unpictured)

Unscrew the finial at the bottom of the light and remove the glass fixture. Remove the light bulbs so you don’t risk breaking them later when you install the shades.

Bedroom Light DIY_2

Step 2:

Remove the threaded nipple.

Bedroom Light DIY_3

No, I didn’t make that up just to include more boob references for you. I couldn’t make this stuff up if I tried, and for the record I’m not looking forward to the pervy Google search spambots finding this post.

You can buy extended sizes for a few dollars in the lighting section at your local hardware store. If you are just adding one lamp shade, then the existing piece will probably be sufficient; however, I wanted to add two shades to create a tiered look so I needed something longer.

Bedroom Light DIY_4

Step 3: Pick out your shades.

I picked up a pretty gray shade at Target for about $24. The color was perfect for the neutral design I was going for, and it was wide enough to accommodate a second shade underneath it.

Bedroom Light DIY_5

Bedroom Light DIY_6

If you wanted to use just one shade to replace the existing light fixture, you want a shade with a spider fitting. You can fit this on the existing fixture, screw on the finial and you’re done! I had it set up like this for a while, but you could still see the light fixture from the top. I preferred to have a shade that reached the ceiling and covered the existing fixture.

For the tiered look, I needed two different types of shades. The Target shade had a Uno fitting which would not fit onto the existing fixture since the ring was too big, the finial would have passed right through the fitting.

Bedroom Light DIY_7

However, when I stacked a shade with a Uno fitting over a shade with a spider fitting, it was perfect. The white shade is something I had on hand, but I’d like to eventually swap it out for something with a pretty pattern.

Bedroom Light DIY_8

From that point, installation was incredibly easy. I fit the shades over the threaded nipple and the finial held everything together. 

Bedroom Light DIY_9

Step 4:

Add the light bulbs back in, and you’re all DONE!

In addition to the light, I also put up some art to finish off the room for now. I’d eventually like to repaint the walls, change out the art, add some storage, and hang new curtains.

All in good time.

Bedroom Light DIY_11

DIY Foyer Bookcase Toppers

If you happen to have today off for the holiday, I hope you are having a great long weekend. My twitter feed is filled with pictures of BBQ food and beach days, you’re all making me jealous.Tomorrow is my first day back to work after a glorious week off and I can’t say I’m looking forward to it. So I figured I should catch you up on another project that has been crossed of the list.

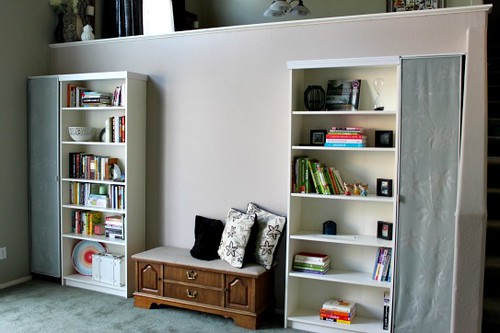
If you remember back to this post, I recently built the bookcases for the foyer library. It was economical to use IKEA Billy bookcases since I already had a few at home, but they look like IKEA bookcases. Not bad, just unfinished in a way which was not the look I wanted. I could actually get past classic IKEA look, but I couldn’t get past the the view as I was going upstairs.

Bookcase Moulding_Top_1

Awful…and that has nothing to do with the amazing amount of dust on top. My original hope was to have the bookcases look like built-ins and the unfinished bookcase tops made them look horrible. I considered painting the dark brown bookcases white (and I still might in the future), but that would not fix the look of the tops.

Instead I decide to build a simple topper to not only give the bookcase a finish look, but also add some ‘built-in’ moulding.

Bookcase Moulding_Top_2

Construction was very simple. I took a piece of pressed MDF from Lowes and cut it down to the size of the bookcases. I then added a simple moulding to the side and part of the front. I couldn’t add the moulding to the entire front of the board because it wouldn’t accommodate the door. Above the door I added a piece of 1/2 round to give the board a finished edge.

Bookcase Moulding_Top_3

A little wood filler, primer, and paint finished off the look. The greatest part was that they fit right on top and don’t need to be adhered to the wall or the bookcase. Easy.

Since I had the moulding and 1/2 round already on hand from another project, I only had to purchase the pressed board. I chose the pressed board because it was cheapest option. The boards are precut 2’ x 4’, so I was able to cut it in half and fit both bookcases. Overall this project cost me less than $10 for the pressed board.

Bookcase Moulding_Top_4

I also did a little organizing (and cleaning) so it’s looking better all around. I can’t wait to see how much better it looks once I’ve refinished the hope chest and added some art.

Bookcase Moulding_Top_6

Just one last look…

Before.

Bookcase Moulding_Top_1

After.

Bookcase Moulding_Top_5