Weekly Eats & Grocery Budget

After last week’s post, a few people asked me if I am making meals solely with what I buy each week. I’m not. I have a better than average stocked freezer and pantry which allows me to make a lot of meals using only some of what I buy each week. In fact, often my weekly grocery trips is restocking my pantry or freezer/fridge. For example I did not use the pasta sauce I bought this week, but I didn’t have any in the house so I picked up a few jars on sale to use in the future. I also didn’t eat the Activia yogurt this week, but it was very cheap ($1 per 4 pack), and I can freeze it in an ice cube tray and use it for smoothies in the coming weeks.

I was also asked about which coupon websites I reference. These are my favorites. I have them in my Google reader and keep an eye out for sales all week, gather up my coupons and shop one day per week. I did a post on Target Coupon Shopping, here, which gave a few more tips.

Krazy Coupon Lady

Totally Target

Groceries 2/29/2012

Groceries 2/29/2012

Groceries 2/29/2012

Grocery Total 2/18/2012 : $46.44

I did go over budget this week by $6.44, primarily because I did most of my shopping at Target and used my Target Debit Card to get the extra %5 off the bill. My grocery shopping was mixed with other shopping, so while I did get a better deal, I didn’t pay with cash and was a little off in my math this week. Oh well, it’s a process. Since I went over during this trip, next week will be reduced by $7 to keep the budget even.

Vons: $8

Eggs (1 Dozen)  FREE
Green Onions (2 bunches)
Mushrooms (2 containers)
POM Wonderful Juice (16 oz) (2 bottles)

Albertsons: $8.77

Barilla Pasta Sauce (2 jars)
Fresh Carrots (5lb) DOG TREATS
Broccoli Florets (1 bag)
Hunt’s Tomato Sauce (1 can)
Hunt’s Ketchup (1 bottle)

Target: $29.67

Campbell’s Slow Cooker Soup (2 bowls)
Tazo Tea (2 boxes)
1 Gallon Milk
Imperial Stick Butter (1 package)
Cheeze-It’s (2 boxes)
Shredded Cheddar Cheese (1 package)
Lunch Meat (Ham) (1 package)
Activia Yogurt (2 – 4 packs)
Paper Towels (1 roll)    FREE
Clif Z Bar Bonus Pack (2 bulk size boxes = 36 bars) CLEARANCE

Here are a few of the meals that I had this week. If there is a meal in which you want the recipe, let me know. If it’s not something I plan to post, I can share it with you via email.

Chicken Pesto Shells

Chicken Pesto Shells

Soft Boiled Eggs and Toast

Shrimp with Veggies/Brown Rice/Walnuts & Feta

The veggies/rice/feta mix was great, but I think I cooked the shrimp too long.

Shrimp Potato Bowl

Baked Potato with Balsamic roasted mushrooms & White Cheddar

Balsamic Mushroom & White Cheddar Baked Potato

I’m Feeling Inspired: Beautiful Strength

Yogis and Dancers hold a special place in my heart. The immense strength it takes to move in such a beautiful way and not display the intense strain, strength, and sometimes pain it takes is moving to me. I can’t properly articulate the passion for dancing and while I’m not a dancer, it is incredibly important to me. Yoga falls a close second. In my dreams I own a dance/yoga studio. In the meantime I’ll take this inspiration to keep doing what I love and maybe someday I’ll look half as amazing as these people.

Pinned Image

Via

Pinned Image

Via

Pinned Image

Via

Pinned Image

Via

Pinned Image

Via

Pinned Image

Via

Pinned Image

Via

Pinned Image

Via

Pinned Image

Via

Pinned Image

Via

Pinned Image

Via

Pinned Image

Via

Pinned Image

Via

Pinned Image

Via

Pinned Image

Via

So True!

Pinned Image

Via

DIY: Daily Letterpress Calendar Journal

Wow…The last part of the week really got away from me, hope everyone is having a great weekend so far!

I am ridiculously excited about this project and I meant to have it up on Thursday but I ended up working late on Thursday/Friday. I also had a little trouble writing up this post because every time I starting writing about this project, I just sounded like a giddy little kid over a calendar. In the end, Logic me says “don’t be so excited about a calendar, people will think you’re weird!” and Authentic me says “THIS IS AWESOME!”.

I like Authentic me better.

Every year I go on the hunt for a fun new calendar for the office. I purchased this one a few years back at Anthropologie, and loved it. It sparked an admiration for letterpress calendars and I spend a lot of time looking for my favorite each year.

I had this calendar. Loved it.

About 6 months ago I saw this picture on Pinterest and was immediately smitten. I poured over the original DIY post at Design Sponge and immediately started planning my own calendar idea for the new year. With this in mind, I thought I could marry this daily calendar idea with my love for the smaller letterpress calendars.

It was all over for me when I found the amazing letterpress calendar over at Letterpress Calendar. I first saw their 2011 calendar after it had been released so I waited earnestly for the 2012 version.

This is the 2011 version I first fell head over heels for. I still wish I could get a copy, it would look lovely framed.

https://i0.wp.com/www.graphic-exchange.com/images/00perso2011/01jan2011/letterpress-calendar-28.jpg

The colors…the design… ::swoon::

So while I didn’t get my hands on the 2011 version, I am the proud owner of this beauty.

 Daily Calendar

Only 500 are made so it feels extra special to me. My little piece of calendar art.

Daily Calendar

Now that I had the calendar I needed a box. Using some 1 x 4 scrap wood, I built a simple wood box that fit the calendar. My dad gave me his old band saw a few weeks back and it made quick work of the scrap wood. I cut, built and sanded the box in about 20 minutes. It’s held together with nails, no glue. Nothing too fancy.

Daily Calendar

I love the piece on the bottom, gives it a worn feel.

Daily Calendar

Daily Calendar

I also beat it up a little bit since my hope was to create a box that looked rustic, worn…and, well loved.

Daily Calendar

After the sanding was done, I stained it using Rust-Oleum Kona and then sprayed it with a few thin coats of Satin finish poly.

Daily Calendar

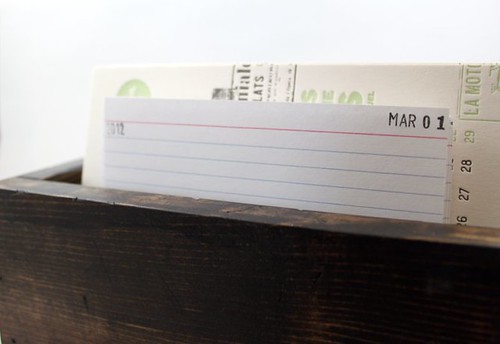
Due to the weather it took about 24 hours to fully dry so in the meantime I went to work on the individual day cards. Using a standard date stamp from Staples, I stamped each 4 x 6 index card with the day in the upper right hand corner. The year was stamped on the first line of the left side.

Daily Calendar

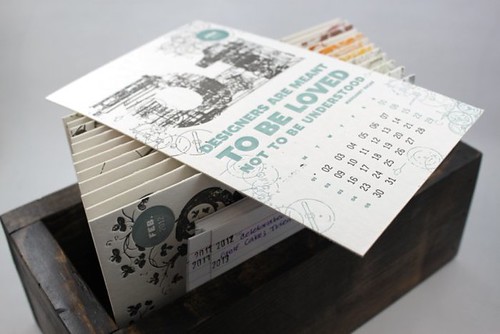
Then came the fun part of putting it all together. I used the letterpress calendar as my monthly dividers, specifically laying them on their side so that the month is showing in the upper left hand corner.  I’ll apologize now for the multitude of pictures. I may have taken more of this calendar than I have of my kid dog.

Daily Calendar

Daily Calendar

Daily Calendar

*told you…I’m obsessed!

Daily Calendar

Since the fit is a little tight to sort through the days, after I fill in the item for that day, I move the card to the back. It will rotate all year long.

Daily Calendar

Daily Calendar

I’ve also started stamping the next year on each card after my note so that it’s ready for next year.

IMG_3898

Daily Calendar

Daily Calendar

Daily Calendar

Ok, I’ll stop the calendar porn now. I can’t wait to look back at this year after year to see a daily diary of life.

Weekly Eats & Grocery Budget

*This will be a new weekly feature on the blog that will share how I stay within my new grocery budget and pictures of weekly eats. (Usually they won’t be this long winded, but a little explanation was needed this week so you understand why I’m doing this).

About a week ago I heard  a word I’ve heard all too often in the past few years. It’s a word that brings back terrible memories for me of lost friends, tearful days, and obscene STRESS & WORRY.

The word I heard was LAYOFFS.

I’ve made a conscious choice to not discuss on the blog where or what I do in my ‘9-5’ job to maintain a level of anonymity.I believe at most I’ve stated that I am a Project Manager for a Telecommunications Company. This decision was not made so that I could bash my company without them finding out, I have absolutely no intention of doing that. I made that decision because I felt it was important to have a space that was my own that wouldn’t become a conversation on business calls. For the most part, my coworkers do not need to know that I installed window films last weekend or that I have a serious Pinterest addiction. However, I will mention that like many other companies, mine has been going through a large reorganization of personnel. This will be the 4th major round of layoffs that I’ve been through with the same company. There have been several other rounds of layoffs, but only 4 have seriously threatened my position.

The first time, my position was downsized. I floated within the company for a few months, jumping between temp jobs while management promised to find me a new position. I was eventually moved to a new team and a completely new job where I stayed for about a year before the next round of layoffs.

This next round I survived the cut and kept my position only to watch all but 2 of my friends/coworkers lose their jobs. It was devastating to watch, I can only imagine what they were going through.

A few months later I heard the dreaded word again and this time I was put on the ‘layoff list’. The list was never something we saw, but the story was that a manager would list out who they were letting go and then that would be passed to other management teams who had the opportunity to scoop you up if they had space on their team. I was lucky and had made a contact only 5 months earlier that gave me a chance on her team. This was in 2009.

While my manager changed shortly after I entered my new role, I have stayed on that team for 3 years. Now we’re at it again…

I don’t know yet whether I will have a job in the coming weeks so I’ve started making some adjustments to my budget just in case. It can’t hurt to save a little money even if I’m kept in this round.

[Maybe I watch a little too much reality TV, but I keep feeling like I’m in danger of being voted off the company island.] So I’m working to pad my piggy bank.

BUBBLE BANK

Very cool coin bank, that I cannot afford (even if I wasn’t worried about my job)


There are lots of ways to save money, namely getting rid of all non-essential purchases. I’ve already created a short list of what would immediately go if I do lose my job, such as cable, Netflix, various memberships, etc. However, I’m tackling my grocery bill first. Even if I keep my job, I plan on sticking to this budget going forward.

Rules:

  • Pay cash
  • Weekly budget of $40
  • Use Coupons
  • Weekly Grocery Budget does not include my dogs food, but will include his treats
  • When possible, make what you don’t need to buy (i.e. make cookies and bread instead of buying them)
  • Consider buying in bulk

I know $40 isn’t possible for many households, but I’m a one person household so this shouldn’t be a problem. I’m also starting with a very well stocked pantry/freezer so I’m not having to eat only what I buy with the $40 each week. Often that $40 will go to replenishing items and I will stretch it out as much as possible with coupons.

Grocery Budget

These posts are always going to be about a week behind so I can show you both what I bought for $40 and some of the meals I made. This haul was purchased from 3 different stores and it cost me $39.29. How’s that for cutting it close!

Grocery Haul – 2/11/2012

Groceries 2/11/2012

Costco: $3.79

1 very large bag of Spinach (this bag typically last me about 2 weeks and I use it almost everyday)

Henry’s: $4.99

5lb Box of Cuties Clementines

1 Coconut Chocolate Chip Clif Bar (not pictured because I ate it during the grocery trip. Seriously good flavor, by the way)

Albertsons: $30.51

Swanson Flavor Boost (Qty: 2)

Hormel ~1.5 lb Seasoned Pork Loin (Qty: 2)

Light Cream Cheese (Qty: 1)

Tyson Cooked Grilled Chicken Strips (Qty: 2)

Bolthouse Mocha Protein Drink (Qty: 1)

Palmolive Dish Soap (Qty: 2) – These technically aren’t part of my weekly eats because they were part of the doggie donation, but with coupons it was cheaper to buy them with the weekly groceries, instead of separately.

5lb Bag of Whole Carrots (my dog eats these instead of boxed dog treats)

White Sugar – 4lbs


I didn’t take any pictures of the coupons I used, but I had a stack of them to keep the Albertsons bill low. One coupon was for a free pork loin so it saved me $10 right away. Coupons may seem like a lot of work, but without coupons the Albertsons trip would have cost me $52.93, well over my entire weekly budget.

I also want to point out that I rarely eat out, and cook almost all my meals at home, so this budget is not being supplemented with any ‘eating out’ money. Here are some of the meals/foods that I made.


DARK CHOCOLATE NO BAKE OATMEAL COOKIES

These were my sweets for the week (made using some of the sugar from this weeks grocery trip). I should also note that these lasted a total of two days…thinking they would last a week was more than a little hopeful.

Dark Chocolate No Bake Oatmeal Cookies

Spinach Salad with Walnuts, Feta, Grilled Chicken Strips, Cilantro Dressing

Spinach Salad

Breakfast for Lunch (using leftovers)

Eggs, Toast, Rosemary Potatoes, Feta, Avocado

Breakfast for Lunch

Banana Mocha Smoothie

Banana Mocha Smoothie

Turkey Burger with Spinach & Fontina

Turkey Burger w/ Spinach & Fontina

Simple Lemon Pasta

Whole Wheat Pasta, Lemon Juice, EVOO, dried Italian herbs, garlic powder, panko, parmesan

Simple Lemon Pasta


What tips do you have to same money on groceries? Any other coupon lovers out there?

Productivity & Privacy

I was on a roll this weekend! Since my to do list has been getting longer and longer lately, I decided to dedicate this past weekend to making some progress. On Friday I finally cleaned out all the kitchen cabinets and drawers (I put a little music on in the background and zoned out while sorting silverware). Seriously, it was great to finally get it done. On Saturday I did all my grocery shopping and ran a few errands. I also organized my office desk, painted the hallway, walked the dog, and cleaned the rest of the kitchen. The momentum continued into Sunday where I ran a few more errands, deep cleaned the bedroom, did some random organizing all over the house, and installed window films.

So even though it wasn’t anything exciting, I made some serious progress on my to do list which means less stress for me this week. Yay!

Of all the things that I accomplished this weekend, I’m most excited about the window film installation in the bedroom. You see, I have a bit of an awkward situation in my master bedroom.

I have a window behind my bed. The awkward part is what you see when you open the blinds.

Master Bedroom Window Films

Hello Neighbors!

Master Bedroom Window Films

One downside of living is a condo is the close living quarters to your neighbors. I’m actually quite lucky and don’t have this problem with all my windows, there are only two that face directly into my neighbors house, the bedroom and bathroom window. 

Now, I’m sure my neighbors are very nice, but I don’t want to look into their bedroom. On that note, I don’t want them staring into mine either. I noticed that we all keep our blinds closed 24/7 so I must not be alone in this feeling.

While I’m not missing a great view, I am missing a lot of light with the constantly closed blinds.

Master Bedroom Window Films

After the window film success in on the French doors to the backyard, it seemed like the perfect plan for this room as well. It would give me all the light, but I’d get the privacy as well.

As one person, I needed both hands to install them so I don’t have any installation pictures. However, the installation is very easy and only took about 30 minutes. Overall it took me a little over an hour from start to finish, since I had to take the bed apart to access the window for installation. 

One window done. You can see from this picture how much privacy I get with these films.

Master Bedroom Window Films

These photos are awful at giving you an idea of how much light they let in because I was taking the photos facing the light source.

Master Bedroom Window Films

While I don’t need them for privacy, I did put the wood blinds back up act as temporary black out shades. Once I have curtains picked out, I’ll remove the blinds completely on this window.

This is the best shot I could get, using only the light through that back window. You’ll have to trust me when I say it’s a huge difference to the room.

Master Bedroom Window Films

And to Baxter’s amusement, he has not lost his view, since I can still open the window so he can look outside. He likes to watch (and growl) at the little Chihuahua in a backyard, two doors down. He feels all ‘top dog’ since the little dog can’t figure out that Baxter is creepily staring at him from a third floor window. Poor little Chihuahua.

Baxter’s Favorite Spot…so much for my pretty pillows.

Baxter

Total Project Cost Breakdown:

Gila Frosted Window Films for 1 Large Window (Lowe’s) = $20

Gila Application Kit (Already Owned) = $0

Total Cost: $20

(plus I have extra film that can be used for a few small windows around the house)

I’m Feeling Inspired – Kitchens

I haven’t shared it on the blog yet, but I’ve recently imposed a strict grocery budget in my house (I’ll explain more on Wednesday). This means I’m spending a little more time in my kitchen lately  cooking and planning meals. So while I’m off painting random walls in my house this weekend, here’s a little kitchen inspiration.

Pinned Image

Via

Pinned Image

Via

Pinned Image

Via

Pinned Image

Via

Pinned Image

Via

Pinned Image

Via

Pinned Image

Via

Pinned Image

Via

Pinned Image

Via

Pinned Image

Via

Genius!

Pinned Image

Via

I Found My Dream Home…

…too bad someone else is buying it.

Sometimes when I’m bored (uhh…or procrastinating) I search through homes for sale on Redfin. I’m not actually looking for a home to buy, I’m usually looking for design inspiration. Last night I found the house of my dreams, and while I’m not even close to being able to afford something like this, it doesn’t mean I can’t dream. Even since I moved into my current house, I’ve been building my next home list; things like, balcony off the office or bedroom, landscaped backyard (for Bax), near the beach, bungalow feel, etc.

I’ve had a picture in my head of this house that I want, but I haven’t been able to describe it to anyone. To be fair, I’m pretty terrible at describing projects without props or pictures. I tried to describe a project to my dad recently and after an elaborate 20 minute description he responded with “so, you want to build a box?” Uh yeah, I do.

The house is in La Jolla (San Diego), California. $2,950,000

3 Bedroom, 2.5 Baths, 3291 square feet, Balcony, Landscaped Yard, Dark Wood Floors, Office, Garage, Extra Parking, Ocean Views

I’ll let the pictures do the rest of the talking on this one.

120007087_1

 120007087_1_1

 120007087_15_0

 120007087_2_1

 120007087_3_1

 120007087_4_1

 120007087_5_0

 120007087_6_0

 120007087_7_0

 120007087_8_0

 120007087_9_0


 120007087_11_0

 120007087_12_0

 120007087_13_0

 120007087_14_0

 120007087_10_0

Photo Source: Redfin

Banana Mocha Smoothie

I’m always on the hunt for simple, delicious, healthy-ier breakfasts. I’ve never been one for large, heavy meals in the morning so I typically start the day with an English muffin with PB, small bowl of oatmeal, or a smoothie. As much as I love my green smoothies, sometimes they’re a pain to make when I’m running short on time. This smoothie has only 3 ingredients and blends up in just minutes.

The key ingredient in this smoothie is a premade protein drink. Bolthouse Farms makes a Mocha Cappuccino Perfectly Protein Drink that is delicious. I’ve been known to drink a glass for breakfast all on it’s own. Each serving has 8 grams of protein which I’ve learned is key for keeping me full throughout the day. Pair it with a piece of fruit and you’re set to go.

I also have to point out that I don’t like bananas, it’s a texture thing and I can’t eat them raw without gagging. However, I can eat them frozen or mixed into other things like smoothies or breads. I also tend to run very low on Potassium and bananas are a great source so this was my way of getting fruit and a super dose of potassium in one drink.

Banana Mocha Smoothie

Banana Mocha Smoothie

Serves 1

  • Large Banana, chopped and frozen
  • 8 oz Mocha Cappuccino Drink
  • 1 Scoop Amazing Grass Chocolate SuperFood Powder
  • Cocoa Nibs (optional)

Banana Mocha Smoothie

Blend…Blend…Blend…

Banana Mocha Smoothie

The smoothie will be pretty rich and have a decent cocoa flavor, but I also added a few Cocoa Nibs for crunch. I usually only do this if I’m drinking this in place of a desert, which I do quite often lately.

Banana Mocha Smoothie

Delicious!

My Doggie Valentine

Since this little man is my beloved Valentine this year, I thought I’d share a little about how he came into my life.

IMG_0033

In 2005 I lost my my last dog to cancer. It broke my heart and took me almost 3 years to work up the courage to get another dog. I knew I couldn’t get a beagle again, it was just too hard for me, and I wanted a running partner so I set my heart on a Lab. For my birthday in 2008 I told my Mom that I was finally ready to get a dog again and that in lieu of presents, I was accepting donations to the ‘Puppy Fund’. I also told her that I was 100% certain I wanted a Chocolate Lab Puppy.

At the time I was living in an apartment that charged about $1000 pet deposit plus another $35 each month as pet rent so I needed a little upfront money. Since I wasn’t expecting to actually get the dog for another few months, I didn’t tell anyone else about wanting a dog.

Less than a week later I received an email from a good friend asking me to pass along some info about a dog that needed a home. He had sent it to me as an after thought, not knowing that I wanted a dog, just knowing that I loved pictures of cute puppies.

This little one needed a home.

Baxter 03

So a week after deciding that I wanted to get a chocolate lab puppy, one showed up in my email inbox. It’s funny how things work out. Another family was originally going to take him, but the father lost his job so they decided against getting a dog. The mommy dog had accidently stepped on the puppy’s leg and broke it which is why he was in a cast. Within about an hour, I had agreed to get the puppy.

Baxter 06

At the end of May 2008 I brought Baxter home. He was 3.09 lbs with dagger nails and teeth. His eyes were an amazing blue, he had no hair on his belly and didn’t yet know how to pant. I honestly don’t know how old he was. I was told 8 weeks, and he was the runt, but he seemed more like 4-6 weeks old.

I took him to the pet store on the first night and the only collar that would fit him was a tiny pink kitten collar.

Baxter

sssttttrrreeetttccchhh

he looks so innocent...then he got up and pee'd on the carpet

He kissed up to my parents that first weekend, falling asleep in their arms and fitting into the palm of my dads hands.

Sleeping in Grandma's Arms

Yes, I really am that cute!

“Oh yeah, I’ve got them wrapped around my little bitty paws!”

Grandpa and the Pup

In the coming weeks he perked up and developed his incredibly playful personality. Even now, almost 4 years later, he still things he’s 3 months old and 10 lbs.

Innocent lil puppy...or so he seems

I'm not getting into any trouble...yet ;)

I'm gonna get that camera...

My frog is almost bigger than me!

Yum Yum...frog legs

Couch Potato…

Lazy night watching TV

I may have annoyed him with the camera more than once…

Kisses Mom!!

I love the spotlight!

I wish he would have stayed this size, I believe he was about 15 lbs here…

Bax02

As he was getting bigger we made many trips to dog beach (it’s the thing I miss most about having moved inland)…

Doggie Beach Aug 02 09

Baxter at Dog Beach

Hitting the Waves at Dog Beach

…but he’ll live with dancing in the sprinklers until I can get him to the beach again.

He's in heaven when he finds sprinklers

He loves his walks, but I learned the hard way he wasn’t the greatest running partner. He likes to find big sticks and smack me in the back of the legs with them.

“Go FASTER Mom!” He’s such a drill sergeant.

Baxter and his walking stick

At the apartment, my couch was right next to my desk. He used to sit like this all the time.

Couch Potato

…and he’d sit like this if I wasn’t paying attention to him.

Baxter

It took till about 3 years old for him to calm down and turn into ‘America’s Favorite’ dog breed.

Baxter

Up until then, he often spent his time like this…

Is there any left?
He did all of that while I was taking a shower one day. He shredded mail, packages, trash, magazines, then found the empty food bag.

I cleaned up…he took a nap. He has such a tough life.

93/365: November 1, 2009

So that’s my little Valentine. In the past 3 1/2 years he’s gained about 90 lbs and while he’s calmed down, he still has the same playful personality he did at 3 lbs. He still thinks he can fit in my lap and that I should carry him down the stairs. Big baby.

In honor of Baxter, my puppy Valentine, I took the money I would normally spend on a Valentine gift and put together a doggie donation package for my local animal shelter. Animal shelters often need the basics to take care of the animals that come in on a daily basis. A lot of people will bring in food, treats, unused leashes/crates, cash donations. All of which are GREAT. However, I decided to fill a few other needs for them and put together a package of towels, rope toys, dish soap & laundry detergent. You can get a list of needed items directly from your local shelter.

Valentine Doggie Donation

It seems odd to include dish soap and detergent in a donation for animals, but we forget that the shelter often needs these things to keep food dishes and bedding clean. Hopefully it helps, ever if only a little bit, so that my local shelter can keep doing great things by taking care of these amazing animals.


Baxter and I hope everyone had a very Happy Valentine’s Day.

Much LOVE to you all!

Baxter 3 years old

DIY: Heart Art

Technically I did this project for Valentines Day, but it really doesn’t have to be only for February. I think it would look adorable in a little kids room year around, in fact, it’s an easy project that kids can do with you.

Heart Art

I started out with a piece of framed art from Christmas. I had hung this over the mantle for the holidays, but wanted to use the frame for something else throughout the year and this project seemed perfect.

Step 1:

Find an empty frame. A floating frame would look really beautiful with this type of art too, the hearts would appear to be floating on your wall.

Heart Art

Step 2:

I took the Christmas Art out and replaced it with a blank sheet of white computer paper. Nothing fancy here.

Heart Art

Step 3:

Collect the rest of your supplies.

  • Heart shaped scrapbook punches (I used two different sizes)
  • Rubber Cement
  • Scrapbooking or other colored paper

Heart Art

Step 4:

Cut out a bunch of hearts from the scrapbook paper. Begin laying them out to get an idea of the design before you start gluing them down.

Heart Art

Step 5:

Start Gluing to the frame and glass using rubber cement.

This project was all about texture. I folded some hearts in half to give them a 3D look, others I left flat. Most were glued directly to the glass, while some were glued to the frame for additional dimension. The reason I glued on top of the glass, instead of laying them under, was so that I could fold them. This was my alternative to using a more expensive shadowbox.

I used the rubber cement because after February I expect to remove the hearts and use the frame for something else. This is purely temporary for this month.

Heart Art

I wanted it to look like the hearts were sweeping across the frame. There was no magic in how I laid them out, it was all by eye and how the pieces was flowing.

Heart Art

Heart Art

Step 6:

The finished piece. Add some hangers, if necessary, and hang on the wall.

Heart Art

I really love how it turned out and there is a part of me that is considering leaving it up longer than February. It also sparked my art bug again and I can’t wait to dig into my paints soon. I’m thinking the paintings in the spare bedroom may have some mixed media incorporated, perhaps some hearts…

Heart Art

Heart Art

Heart Art

Total Project Cost Breakdown:

Frame/Mat/Paper/Glass (Already Owned) = $0

Scrapbook paper (Michael’s, clearance colors) = $.19 each (I used 4 colors so it cost $.76 and I have plenty left over)

Large Heart Punch (Michael’s) = $12 (on 40% off)

Small Heart Punch (Michael’s) = $2.50 (also 40% off)

Rubber Cement (Staples) = $2.50

Total Cost: $17.76

If you are a crafter then you likely have heart shaped punches already and the project would cost only a few dollars. For anyone that likes this idea, be sure to check out your local craft store right after Valentine’s day, they will likely put heart craft items on clearance and you could purchase some for next year.

I hope everyone is having an excellent Valentine’s Day…I’ll be back later today to show you a special Valentine gift I’ve been planning.

Heart Art