DIY Dark Wood Laundry Drying Rack

A few months back I bought a carved wood hook (from HomeGoods, surprise surprise) that I thought was perfect for the laundry room. I loved the dark wood next to the painting, but it had limited functionality. I could only hand a few things on it, and I need more space to air dry some delicate items.

It also kept falling off the wall, but that was really more my fault than the hooks.

DIY Laundry Dryer Rack

I still think it’s beautiful so it’s being moved somewhere else in the house (not sure where yet).

DIY Laundry Dryer Rack

So down came the hook and I started brainstorming other options. l thought of grouping some single hooks in some sort of pattern on the wall, or a shelf that could at least provide some additional ‘counter’ space.

DIY Laundry Dryer Rack

Then I saw the genius DIY post over at Centsational Girl for a dryer rack and the light bulb went on above my head. Actually it more like I swiped the light bulb that formed over her head (but whatever). That would be perfect to replace the wobbly hooks and add some additional functionality to the laundry room.

I picked up a 2’ x 2’ piece of plywood which fit the space perfectly, no need to cut it down. I also picked up 2 pieces of 1 x 3 boards and some 3/8 inch dowels.

DIY Laundry Dryer Rack

I followed the steps in Kate’s post with the exception of the finish, and I used chain instead of brackets for the sides. It took a few days to build and stain the entire piece since I worked on it in small chunks of time in between work and other projects, but it could be easily built in an afternoon.

DIY Laundry Dryer Rack

Drilling the dowel holes was the fun part. Who ever thought I’d have such fun with power tools.

DIY Laundry Dryer Rack

DIY Laundry Dryer Rack

I used Rustoleum Kona for the finish, which is essentially the ORB of the stain world. To create the darker finish color, I didn’t wipe off the stain. I apply it in thin even coats and let it dry. I then applied a few thin coats of Satin Poly to protect it since damp clothes will be laying directly on the wood. 

DIY Laundry Dryer Rack

Just like Kate, I used a sash lock on the top to secure the piece when not in use. The knobs are from some old IKEA furniture which I’m thinking of painting a light aqua color, but for now the dark iron color works well.

DIY Laundry Dryer Rack

I LOVE this thing! Especially since it was fairly inexpensive. All the supplies cost me less than $20 since i had the stain, knobs, and tools already.

DIY Laundry Dryer Rack

It almost blends into the wall as a piece of art which is yet another reason why it ROCKS.

DIY Laundry Dryer Rack

2 Year Home Anniversary – A Look Back

Alright, first things first. Who’s making a Golf Cake for Father’s Day?

Golf Birthday Cake

It’s been the most popular post on the blog lately, so I suspect there are quite a few golf enthusiasts out there that will be eating cake this weekend. Great additions would be a sand pit (made with brown sugar), or a flag (using a skewer, cut in half). I’d love to see those cakes if anyone does it! I may just do a special post to share your golf cake pictures so feel free to leave links in the comments or email me pictures.


Okay, now back to the point of today’s post. The 5th of this month was the 2 year anniversary of when I purchased my first home. I didn’t start the blog until a year later so there are a bunch of projects that I never originally blogged about; although, I have been trying to share finished projects in order to catch up. I thought it would be fun to look back at some of the before and after pictures from the past two years.


Front Door Entry

There haven’t been any major changes to the front door with the exception of decorating and I changed out the handle/deadbolt when I moved in. This is my favorite picture from the Autumn setup. The star was found at HomeGoods and I built the Front Door Post myself. In the past year I’ve also created the Halloween Sign, Yarn Wrapped Fall Sign, Valentine Cork Heart, and most recently the Hand painted Welcome Sign.

Front Door Post


Backyard

The backyard has been a bit of a challenge since it is completely paved. I have a dog and I desperately needed some grass so the main goal was to find a way to grow grass on concrete.

K10036663_16_0

BAM…Yes. I. Did.

Growing Grass on Concrete - 1 month update

The grass planters work very well and would continually grow grass year round if my dog didn’t enjoy killing it so much. I’m tempted to swap out the real grass for a synthetic grass this summer.

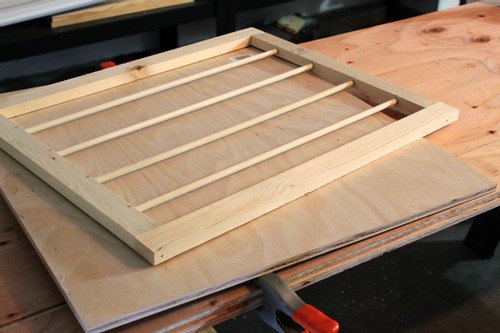
Vertical planters went up along one wall to add some height and extra gardening space.

Vertical Gardening_11

…and I built a potting bench for the wall.

Oh, and I can’t forget the BBQ…still love that green!

IMG_1142


First Floor Bathroom

This is one of the rooms that I did before starting the blog. I had all the accessories with me from my previous apartment so I knew that I wanted a Hawaiian themed room somewhere in the house.

K10036663_4_0

I ended up using a refreshing Bamboo color on walls which really brightens up such a small room.

Spare Bathroom ReDesign- After

Spare Bathroom ReDesign- After

French Doors

Oh, those doors! I though I was stuck with broken blinds until I found inspiration online to paint them!

K10036663_3_0

This project made a huge impact and I’ve since covered several other windows in my house with the privacy film.

IMG_1400

Dining Room

This room is still in progress since I’m currently using a small card table as my dining table.

K10036663_5_0

For under $100 I added moulding and I LOVE it.

Dining Room Moulding - X

I get quite a few questions about that bar. It is a knock off of the Pottery Barn Bar and my dad built it for me. You can see more about the bar, here.

Dining Room Moulding - X


Garage

I’ve shared all my Garage woes on the blog so this is probably not new to you. Over the past few months I’ve made a ton of progress. Remember when…

Garage - Before

…and now with all the shelving, it’s actually functional. I’ve since added a temporary workbench in the open area that I’ve been using for painting projects.


Fireplace

Another project that was well documented on the blog, and probably my favorite project to date. I was SO intimidated by this project that I kept pushing it down the list. I didn’t think I could really do it on my own.

IMG_1644

I started off by painting the fireplace screen, and that gave me some motivation to keep going.

Little by little, I started chipping aware at the tile.

Fireplace Demolition

Before I knew it, the finishing touches were in place.

Fireplace Remodel


Powder Room

This is a small powder room near the living room and kitchen. The room has no natural light which made it difficult to get the wall color right.

K10036663_8_0

I ended up a peachy beige and decorated with that lovely orchid and rustic boxes. The garden lantern on the floor holds extra toilet paper rolls.

Powder Room - After

I replaced the standard oval mirror with a larger version that I scored at HomeGoods for $49 and the Moroccan urn works as a trash can.

Powder Room - After


Kitchen/Ledge

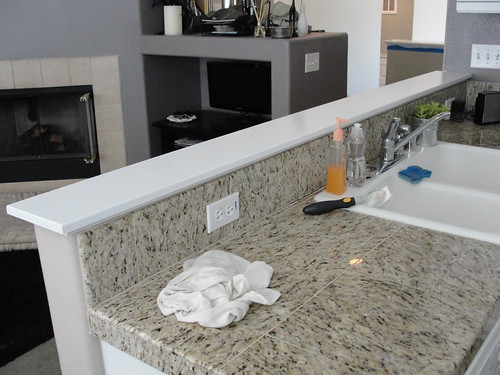
I don’t think I’ve actually share the Kitchen as a whole on the blog before. I’ll show a little more in another post, but we did make one change to that half wall shortly after moving in.

DSC03171

An added ledge. Such a simple addition and it made a huge functional difference to the kitchen.

DSC03173


Office

This one shouldn’t be new to you since I just shared it the other day, but here’s a quick before…

K10036663_9_0

…and in progress (right now)…it will all be changing soon.

Office Before

Spare Bedroom

Another room that’s current in progress (and actually making substantial progress lately!). Before…

K10036663_11_0

…and in progress…

Spare Bedroom Moulding_1


Third Floor Spare Bathroom

Another all white bathroom. A blessing since I wanted to decorate each room myself, but it was so bland when I moved in.

K10036663_10_0

Yes another room that I think I painted 3 times before settling on the green. First it was pink, then it was blue, then I scored with the ‘army’-ish green.

DSC03195

3rd Floor Spare Bathroom - After

(yes, those curtains need to be hemmed)


Laundry Room

The laundry room is the room that you look into when you come up to the third floor, so I wanted it to look good. Who wants to stare at an ugly room every time you come upstairs?

Laundry Room Before

A grey blue on the walls and sea grass baskets gave it the perfect style. Oh, and clearance art…can’t hate that!

Laundry Room

On the wall leading in to the laundry room I have the DIY Chalkboard Thermostat Frame.

“Laundry Today or Naked Tomorrow”

So True!

Chalkboard Thermostat Frame


There are a few other rooms that I haven’t shown you, like the Kitchen, Living Room, and the Master Bed/Bath. I’ll make sure to share those in the future. I’m also going to be updating the Home Tour page soon which will add some, much needed, organization to the site.


Have a GREAT Weekend!

Eco Challenge – Lose The Dryer Sheets

I’ve been using dryer sheets for as long as I’ve been doing laundry. In fact, I’ve always used 2 sheets per load for super soft clothes. However, I’ve done a little research and dryer sheets are loaded with chemicals and I also read that it can actually harm your dryer. I already knew about the chemicals, but I chose to ignore the fact before. Just being honest. I also didn’t know what to replace them with in order to satisfy my desire for soft clothes/sheets/towels.

Dryer Sheets

*I have so many boxes because they go on sale for about 25 cents a box every so often at Target, and you go through a lot when you use 2.

I suppose this eco challenge what the kick I needed to make a change. A little more research introduced me to dryer balls.

Eco Dryer Balls

According to the package this eco options is supposed to cut down on drying time and leave the clothes extremely soft. Other benefits include the fact that they are fragrance free and contain no additional chemicals. I don’t have the original packaging anymore, but I’m going to assume that depending on the brand, they may contain some chemicals in the manufacturing process. I’ve found them online and in stores for less than $10, but I picked up mine at HomeGoods for $2.99. According to research found online, they should last about 5 years before needing to be replaced, of course, their lifespan likely depends on how many loads of laundry you do on a regular basis.

Sounds too good to be true, so I pulled together a pile of clothes and towels and tossed them in the washer. I changed nothing in how I normally do laundry except to swap out the dryer sheets for the dryer balls. I set the dryer cycle on ‘less dry’ and let them go.

Verdict?

LOVED IT!

Dryer Challenge - Laundry

The sound did take a little getting used to since you will hear them being tossed around during the cycle, but after a while I didn’t even notice it anymore (my dog was a little on edge during the start of the cycle though). In fact I was pleased to hear them bouncing around in there, because I originally thought that they would get caught in a towel and not do anything at all. They bounced the entire cycle and everything came out VERY soft. I did miss the ‘fresh spring’ smell that comes with my standard dryer sheets, but was impressed with how soft everything was. The only downside, some things were still slightly damp after the cycle. However, I did use a ‘less dry’ cycle which I won’t likely do again in the future for a load this size. Most things had to be hung and dried overnight. Had I used the regular heat cycle, I think everything would have dried as usual. I certainly didn’t think it dried the clothes any faster though as some online claims made. 


Success! I’ll continue using these in the future.


Now…what the hell do I do with all those boxes of dryer sheets?

The Big Reveal – Laundry Room ReDesign

Of all the chores in the house, I actually like doing the laundry. Maybe it’s because everything smells so good coming out of the dryer. In winter, when it’s cold outside, there’s nothing like holding warm, fresh towels and blankets. Next time you want to do yoga on a cold day, toss your yoga clothes in the dryer for a few minutes. Toasty.

I probably like doing laundry because it’s easy. Let’s face it, you sort (which is no big deal if you do it day by day instead of all at once), you dump (into the machine), pour (in the soap), then turn it on.

Walk away…easy peasy. The machine does all the work.

Now, I will admit the folding after everything dries is a bit of a pain, but if you do it right away, it doesn’t take long. Once I have kids, I want to do something like this…

Source: google.com.au via Kylie on Pinterest

Everyone gets a basket. They drop off their dirty clothes, then the folded clothes go back in the basket and everyone can pick up their loot. So cool, and much easier for mom who shouldn’t have to put everyone’s clothes away, she’s got enough to do.

But I don’t have kids…yet. So I have the perfect size laundry room for a few people and I’m really excited to share that it’s no longer builder grade white. It also cost less than $150 for everything. It’s the first room you see when walk up the stairs to the 3rd floor, so I’m pleased that it turned out so well.

BEFORE

Again, another one that feels like a padded room. White walls, white floor, white cabinets, and white appliances. Oh yeah, and that crappy red sticker (and some dog hair).

….and AFTER!

I took these pictures before I removed the red sticker, so please try to see past that.

I think it turned out pretty darn good!


This is one of those rooms that simply fell into place (others were not so easy). First I picked the color, it’s a steel blue which set off the white appliances/trim nicely. I absolutely love this color so much I wish I could find somewhere else in the house to put it.

From the beginning I knew I wanted a ‘natural’ feel with the baskets and the art. It was pure luck that I found both at Homegoods within weeks of each other. The art was even on clearance, marked down 50% (nothing is wrong with it as far as I can tell).

Project Cost Breakdown

Paint: 2 Quarts of Valspar Beguile= $28 (I almost made it with just one quart, but we needed a bit more)

Canvas Wall Art (Homegoods) =  $90$45

Small Laundry Hamper (Homegoods) = $30

Large Laundry Hamper (Homegoods) = $40

My super sweet mom willing to climb behind the washer/dryer to paint the back corners = Priceless!

Total Project Cost: $146

SHOWING THE LOVE!!

Linking To: Between Naps on the Porch, Keeping it Simple, The Girl Creative, Making the World Cuter, Thrifty Decor Chick, Not JUST a Housewife, Today’s Creative Blog, Savvy Southern Style, We Are THAT Family, Very Merry Vintage Style, Blue Cricket Design, Ginger Snap Crafts, The Shabby Creek Cottage, Vanessa’s Crafty Nest, Addicted 2 Decorating, Shabby Nest, French Country Cottage, Dear Creatives, Ohh Baby Designs, Funky Junk Interiors

Laundry Room Eyesore

Hi All! Hope you are having a great start to the week so far. Did you do anything fun this past weekend?

Me? I removed a sticker this weekend.

Yes, you heard me right. I spent way too much time removing a stupid sticker from my washing machine.

I don’t mind doing laundry, it’s actually one other few chores I like. Aside from the folding at the end, it doesn’t really require much work, at least in my house. But I have an eyesore in my Laundry Room.

Do you see it?

Removing sticker from washing machine

Let’s zoom in a bit…

Removing sticker from washing machine

Do you see that ugly ass sticker on my Washing Machine? It’s the instructions on how to install the washing machine. Apparently the original owners never tried to take it off, so the heat and time baked it to the finish. I tried peeling it, scraping it, soaking it, etc. It’s stuck and I don’t like it one bit.

In an act of desperation, I invested in a very large bottle of Duck Adhesive Remover.

Duck Adhesive Remover, Washing Machine

The bottle is pretty genius. Instead of just pouring the liquid on, it has a built in dispenser pad which makes it less messy. The lid worked as a remover of sorts.

Duck Adhesive Remover

It worked perfectly on the small sticker, this came off within seconds.

Removing sticker from washing machine

I was feeling good after the first sticker, so I drenched the larger sticker and left it to soak for a few minutes. The difference is that the small sticker was paper based and the larger sticker has a waxy/plastic finish. The remover had a very difficult time soaking into the plastic finish on the larger sticker.

Removing sticker from washing machine

The included remover worked for a whole 3 seconds, then I deemed it useless. I switched to a razor blade and came up with this after picking at it for a good 10 minutes.

Removing sticker from washing machine

UGH!!!

Imgaine the whole process on repeat for the next few hours. Yes, I said hours! Not to mention the ‘refreshing citrus scent’ gave me a massive migraine.

Removing sticker from washing machine

Removing sticker from washing machine

FINALLY!! (and yes if you looked closely, I nicked the washing machine a few times with the blade. I’ll be fixing that shortly.)

Washing Machine

Now I have a beautiful washer that looks like new, and no more icky eyesore that makes me cringe.